Dear students PBIS
I have set up this page to be in contact with you even in the times, when you are not allowed to go to school. In our school I not only prepare experimets for Physics but in Makers’ Space I help students to realise their extended essays, group four projects and other practical activities. Some students work on my projects or they come here to realise theirs. You can see pictures here – on the Dream Job page.
Your activities are very limited these days and theoretical subjects coming out of your computers may be tiring a little bit.
For the begining I have prepared three tasks that you can make yourselves at home by using ordinary materials and tools you can find in the most households.
I would like you to
– Try your dexterity, some may be a challenge to you
– Learn some theory about how it works
– Enjoy a lot of fun
RECIPROCAL STRUCTURE
I have got a good topic from Alice Vavruskova to help you with. And I must say it is relly a good topic for these corona days.
Reciprocal structures is an excellent topic for architects so it is perfect mainly for PBIS art department.
Here are some good words to see: https://www.researchgate.net/publication/338799885_Architectural_Modeling_Design_based_on_Reciprocal_Structure
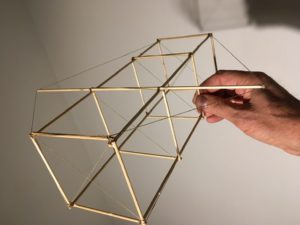
Reciprocal structures are composed of many single elements which create wonderfull patterns. The elements may be conected just by friction and it is really a challenge to build it. But designers want to have their designs firm, so let’s make our first structure glued together.
This is the first final structure that I got from Alice as a goal to reach:

At the beginning we should decide what to work with – the best work is with the matches. You could also use toothpicks.
Another question is – what to work on – I have tried three things, look


At the beginning we should decide what to work with – the best work is with the matches. You could also use toothpicks.
Another question is – what to work on – I have tried three things, look:
is an inflatable baloon covered with cloth, on the right, it is a normal baloon and down it is a glass from a typicsl Ikea lamp. Its shape is ideal.
The first step – put several drops of oil on the surface of glass or plastic and spread it – so that you could easily put the finished structure off.
Make templates – draw a hexagon on a paper and cut it off. The side of the hexagon will be as long as one third of your match or toothpick.
Another template is 60*angle and you can make another template – a stripe of paper, so that you have all the paralel matches in the same distance.
Take six matches and put them around the hexagon which must be in the centre of glass – like on the first picture. Put one drop of glue on the place where the matches touch one another. Use white dispersive glue.
Further steps – add always 6 matches, one drop of glue and keep it dry some 20 minutes


When the glue is dry -better another day, put carefully your structure off the glass or ball. Turn it upside down and put one drop of glue to each place from the bottom and let it dry?
Your reciprocal structure is finished, you are a very handy girl or a boy

Imagine, you could use coloured matches. For example three colours.
There are many more reciprocal structures on internet. If you need to help with making ekements, let ne know.
Jiri 19.3.2021
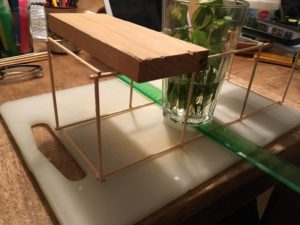
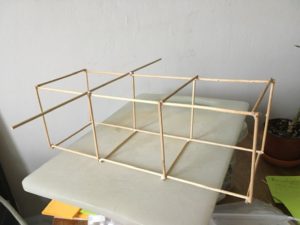
Hello, my patient and handy students
You can also use pieces of wood that we use in physics – splints for your structure.

I will put one bag of splints to the Libus reception, you can have as many you like.
You can make this structure as big as possible. And as regular – reciprocal as possible.
The structure from splints can be made without any glue, but if you want to save it, you can use one drop of universal, white glue for paper and wood.
Send me the photo of your structure that you will like I will put it here on this page. Write if it is glued or not.
Jiri 20.4.21
BOOMERANG
Boomerangs were invented by the Aboriginese and were used for hunting birds flying in flocks, as musical instruments and also as toys. And this is just the reason for your effort to make it.

But let’s have a look at the history of boomerang:
https://www.nma.gov.au/defining-moments/resources/earliest-evidence-of-the-boomerang-in-australia
BOOMERANGS were used in the Stone Age also in Europe (probably non-returnable). But in Australia the Stone Age only finished when the Europeans arrived there and at many places much later:
Let’s have a look at the fascinating video of Aborigines filmed black and white in the 1950th:
But how did the Aborigines make the boomerangs and spears?
Let’s have a look at the short 6min video:
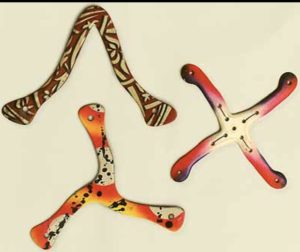
The boomerangs used for playing could look like these ones:
——————————————————————————————-
And now, look at our paper boomerang that you can make yourselves within an hour and fly it even in your room:
What things do you need to make it?
A piece of hard paper – the best one is from the paper box in which shoes are sold. Compasses, ruler.
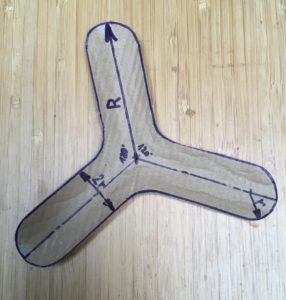
Draw 3 axes by 120* a decide the dimensions: The mine are: R= 7.5cm, r= 1.5cm, draw the outline and cou it out. (Bigger boomerangs also work)
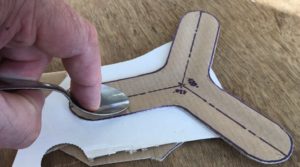
The wings must be bent! You will make it by a spoon, but the wing must be put on two layers of the scrapped paper.
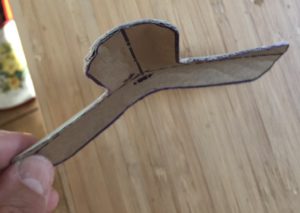
Make the rest of the shape by hands.
 I am left handed
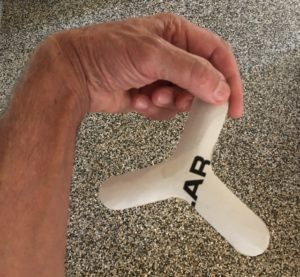
Important: How to throw you boomerang!
The boomerang must be spinning as fast as possible but must NOT be thrown at long distance, otherwise it will turn upside down.
 Thrown by your right hand
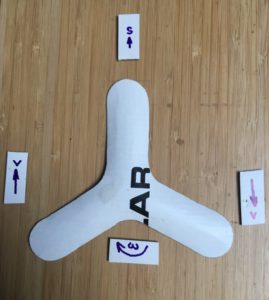
How a boomerang works so that it can return – sometimes back to your hand?
v – Peripheral speed, s – Speed of the centre of gravity, omega – angular speed.
On the left side the peripheral speed and the speed of the centre of gravity will be added. On the right side they will be subtracted. So, the speed on the left side is higher.
The bent profile of the wing will cause the uplifting force as the distances between molecules of air are bigger above the profile, than under the profile. So the pressure above the profile is lower then under the profile. The difference of the pressure makes the boomerang go up. But the higher force on the left makes the boomerang incline. And on its way down it is returning back to you. Your boomerang will be returning even in you room.
Try, try, try. As much spinning as possible. You will learn from your mistakes and youy will succeed.
Good luck with your selfteaching and enjoy the throwing.
Throwing the boomerang:
Jiri
Any questions? – Email me on jiritom@seznam.cz
Idea and Reality
It is a wonderful thing when you have an Idea and it becomes a reality.
The idea was to give students a suggestion to make something funny and useful to relax from computers and on-line learning. A paper boomerang was the thing.
The reality was a half an hour spent in gym with the whole class throwing home made boomerangs and competing whose will remain in the air longer. And it was around 3s.
And there was also another surprise – Alice made her 5 wing boomerang.
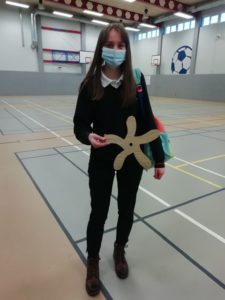
Bravo, Alice
KITE
In Autum boys and girls often fly a kite. Why not to make your own one?
There are many instructions how to make a kite on internet. I would like to present you a small one, that you can make just on your kitchen plastic meat board from ordinary skewers 30cm long (available in all supermarkets) and a plastic foil. In addition you will need white craft glue and chemopren glue and, of course, a long thread.
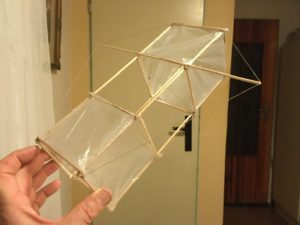
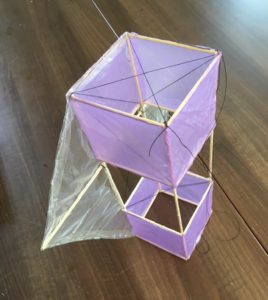 The finished kite without a tail
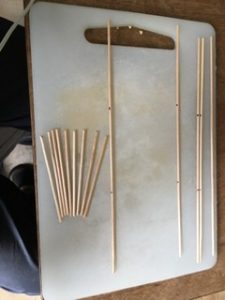
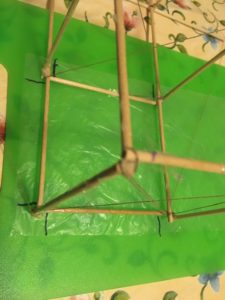
1. Cut 5 skewers into thirds = 15 pieces of the same length.
2. Put long skewers on the meat board 9,5 cm appart, put a weight on them and put the short pieces
accross to make a regular “ ledder”. 3. 3. Glue the joints of the ledder by the white craft glue and let it get dry for at least one hour.
4. Make two ledders.
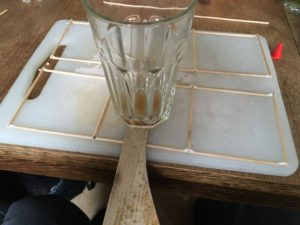
5. Put the ledders one side down 9,5cm appart, put some weight on them, make sure they are standing
in the right angle and are parralel a put short pieces accros and add some drops of glue on the joints.
You will probably have to do it in two steps. One ledder bar will be omitted. This work will demand
your patience but as a student of PBIS you have it enough.
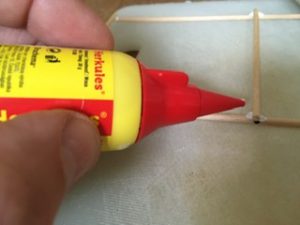
 Add the long skewer, glue it and the kite skeleton is ready. When it is finished, you can take it to your hand and put more glue around each joint.
6. The crisscross thread will make the skeleton stiffer.
 Use a good, strong thread, the same will be used for flying the kite.
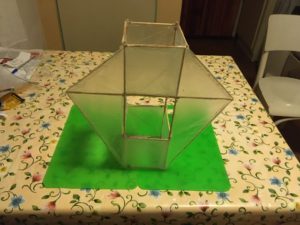
 Cut the marked lines, glue the skewers and wind the foil around it, step by step on the left and then on the right cube.
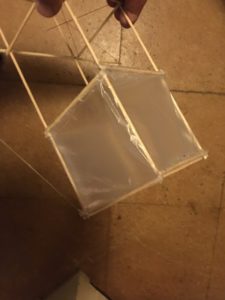
Two cubes are finished.
Now, lay the foil on the table so that it is smooth, not wavy.
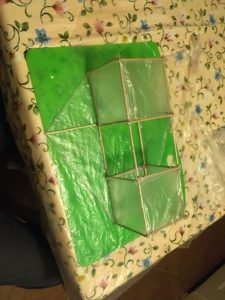
Put the glue on the skewers that are in contact with the foil.
Outline the shape of the kite with some addition of 1cm and cut it out.
Put the glue on the string and the edges of the foil and bend the foil over the thread.
Cut the middle square of the foil but about 1cm smaller on each side.
Put some glue on the skewers and bend the foil around.
Your KITE is finished – nearly.
The last step is – to make a tail, to attach a thread and to fly your new kite.
As to the kite topic, let’s finish it in the Autumn. A will finish the tail and make a cideo how to start the kite.
RECIPROCAL STRUCTURE
I have got a good topic from Alice Vavruskova to help you with. And I must say it is relly a good topic for these corona days.
Reciprocal structures is an excellent topic for architects so it is perfect mainly for PBIS art department.
Here are some good words to see: https://www.researchgate.net/publication/338799885_Architectural_Modeling_Design_based_on_Reciprocal_Structure
Reciprocal structures are composed of many single elements which create wonderfull patterns. The elements may be conected just by friction and it is really a challenge to build it. But designers want to have their designs firm, so let’s make our first structure glued together.
This is the first final structure that I got from Alice as a goal to reach:
At the beginning we should decide what to work with – the best work is with the matches. You could also use toothpicks.
Another question is – what to work on – I have tried three things, look:
is an inflatable baloon covered with cloth, on the right, it is a normal baloon and down it is a glass from a typicsl Ikea lamp. Its shape is ideal.
The first step – put several drops of oil on the surface of glass or plastic and spread it – so that you could easily put the finished structure off.
Make templates – draw a hexagon on a paper and cut it off. The side of the hexagon will be as long as one third of your match or toothpick.
Another template is 60*angle and you can make another template – a stripe of paper, so that you have all the paralel matches in the same distance.
Take six matches and put them around the hexagon which must be in the centre of glass – like on the first picture. Put one drop of glue on the place where the matches touch one another. Use white dispersive glue.
Further steps – add always 6 matches, one drop of glue and keep it dry some 20 minutes.
When the glue is dry -better another day, put carefully your structure off the glass or ball. Turn it upside down and put one drop of glue to each place from the bottom and let it dry?
Your reciprocal structure is finished, you are a very handy girl or a boy.
Imagine, you could use coloured matches. For example three colours.
Jiri 19.3.2021